Often, as amateurs, we rush to buy the telescope that we think is the best based on what we’ve seen, heard, marketing or “intuition”. What you will notice is that most amateurs usually end up buying the “wrong” first telescope and realize they should have done a bit more homework. I hope this guide will be helpful to those looking into getting into deep sky astrophotography by first explaining the basic concepts and relationships between the telescope, the camera and the sky. With the fundamental concepts mentioned here, the reader can then do their own research and study each factor in details. When dealing with telescopes and imaging there are often sever things to consider when picking the size of the telescope, the focal length, pixel size and sensor size and most important average sky seeing.
You may go outside tonight and notice its very dark, while that is great that’s not the whole story. When its “dark” there is not light pollution or moonlight. There are several sites that indicate the sky darks with SQM, brightness, Bortle. Bortle 1 is an excellent dark sky and Bortle 9 is a bright lit inner-city sky from which you’ll see a few stars. Light pollution can be combated be an extent by things like light pollution filters and narrowband filters. Certain software processes like Pixinsights Automatic or Dynamic Background Extraction can help get rid of the sky glow and gradients.
Transparency
When it’s dark and clear you will notice more stars and if you are lucky the milkyway overhead. You are now looking at a dark sky with good transparency. Transparency is good often when there are zero clouds and lower humidity. Even with low humidity things like lower attitude winds may kick up dust which lower the transparency. There may be certain seasons when plant pollen is high further obscuring the light from the stars. Smoke is another cause of
poor transparency. There are several way to measure and quantify transparency which often involves the lowest magnitude star you can see. When the sky doesn’t look dark it’s usually a combination of poor transparency lit up by high light pollution and the end result is a very strong sky glow that washes out any faint detail.
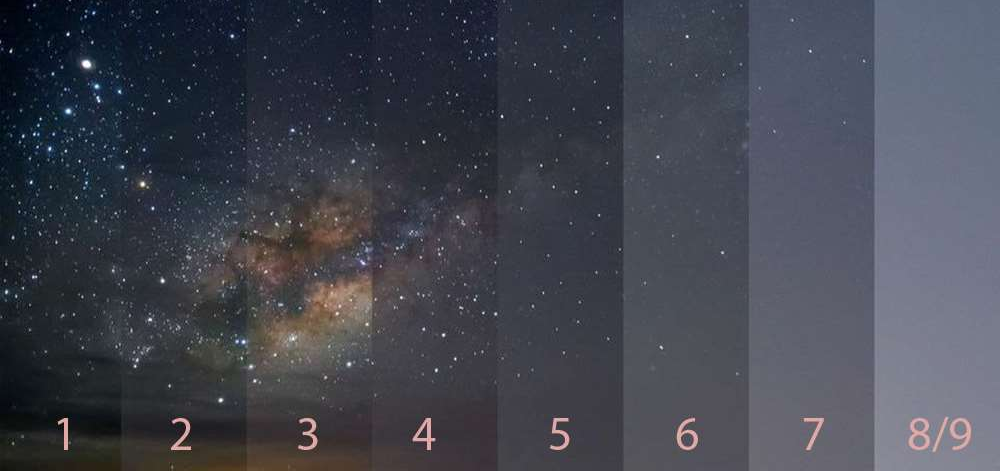
Both these M51 images were taken by myself with UV/IR cut filters and a mono CMOS camera. The image on the left is form Bortle 5/6 skies with good transparency while the image on the right is from Bortle 8/9 skies coupled with poor transparency.

What is “Seeing”
Perhaps the most important factor when choosing a telescope and site is the “seeing” at your particular observation site. Seeing is a measure of calmness or turbulence of the atmosphere, that is, how much the atmosphere blurs the infinitely small point of light of a star. Without getting into too much detail, if we had no atmosphere the size of the star would have an apparent size of the “Airy disk” which is determined by the diameter of the telescope lens or mirror. However, once the starlight passes through the atmosphere it is blurred by constantly moving air turbulence and spreads out the light to a larger diameter. In fact, when you see stars “twinkling” that’s a sign that the seeing is quite poor and the light is being severely distorted. We can measure this diameter and it’s presented in presented in arcseconds. We actually measure the full width half maximum (FWHM) in arcseconds (“). Seeing of 1.0 arcseconds and below is excellent and limited to certain parts of the world and when professional large telescopes are installed. Seeing of 1.0 to 2.0 is still considered very good and can result in very sharp images. 2.0 to 3.0 is what most of us experience and have to work with. 3.0 and up usually blurs image details and doesn’t allow high resolution data capture. Seeing is NOT related to how dark or clear the night is those are completely different factors.

Seeing and Imaging
Seeing will dictate the maximum resolution of fine details the sky will allow us to obtain. If we use more focal length or smaller pixels there is no additional information in the image. This is called the seeing limited, you often hear large telescope are “seeing limited”. When you increase the focal length or decrease the pixel size (image scale) beyond this point, there is no more image detail being recorded, you are just making a larger image. You can do the same thing in the software by simply scaling up the image instead of scaling up your telescope!
Here is what over-sampled and under-sampled images look like:

The image one the left is over-sampled, and you are left with big “bloated” stars. The image on the right is under-sampled and the stars are square and pixelated. An oversampled image is a lot more difficult to work with as the system will show any minor optical imperfection, poor focus and imperfect tracking. The system will be “slower” as well meaning it takes longer to achieve a certain desired signal to noise ratio. An under-sampled image shows less details in both the image and of any imperfections making it easier to deal with. However, in most cases if optimal sampling is not possible, over-sampled is still better than under.

The image above is an example of correct image scale and sampling. The stars look round and pleasing without being large and bloated. The theory behind it is mostly based on Nyquist sampling theorem you can look that up later. In practice the maximum resolution or scale you can work with will be for 2.0x to 3.0x of the seeing (in arcseconds).
So the imager has select the pixel size and focal length to “match” the system to the sky seeing. Focal length can be manipulated by aperture size and focal ratio.
Focal Length = Aperture x Focal Ratio
Pixel size can be picked based on the cameras native pix size (microns) or manipulated by binning or adding a group of 2×2 or 3×3 pixels to form a larger pixel. Knowing those parameters, we can calculate the scale of our image:
Scale = ( Pixel Size / Telescope Focal Length ) X 206.265
How to measure seeing (example):
You will need to something that has a higher resolution capability than what the sky is, here are the theoretical resolutions of some telescopes:
| Aperture | Maximum Resolving Power | |
| mm | Dawes’ Limit | Rayleigh Limit |
| 80 | 1.45 | 1.73 |
| 100 | 1.16 | 1.38 |
| 150 | 0.77 | 0.92 |
| 200 | 0.58 | 0.69 |
| 250 | 0.46 | 0.55 |
| 300 | 0.39 | 0.46 |
| 356 | 0.33 | 0.39 |
Keep in mind these are theoretical, a real telescope will have less resolution due to imperfections, optical design, collimation, focus issues, and etc. From the table we can see the maximum resolution of a typical 4” refractor is not enough to be used to measure the atmospheric seeing in the 1.0 to 2.0 arcsecond range. 200mm and up is better and 250 to 300 would probably be ideal. You want to measure the sharpest star diameter at or near Zenith (directly overhead) where there is the least air column in the light path, this will give you the best possible seeing at that location for that night. Keep in mind seeing will vary from night to night and season to season so ideally, you after 1 full year you will have an idea of what the seasonal numbers will be like.
Things to note before measuring:
Temperature acclimation:
You telescope needs to be perfectly temperature acclimated, SCTS usually struggle with this being large and with closed tubes. An open tube or truss reflectors is better here. What helps: You should wait till several hours after sunset for the ground and air to cool down with less radiative heat altering the seeing.
Local seeing:
Heavy objects will store thermal energy during the day and release it during the night. This mass of warm upward moving air causes local seeing effects. What helps: Stay away from roads and warm concrete floors and wall. These ruin the local seeing. Try to raise your telescope slightly above the ground also helps reduce local or ground seeing effects.
Collimation:
Collimation and focus must be perfect, poor focus will dramatically increase your FWHM measurements and you will be measuring your poor focus and not the atmospheric seeing. Same goes for collimation with reflectors. What helps: Ensure you have perfect focus. Crop the image to inner 50%, most aberrations like tilt, curvature, coma and others tend to be more pronounced the further away you get off axis. So use the central portion of the image for measurements.
Tracking:
If your mount is not accurate enough to track with a very low rms of error then you will not be able to accurately measure the blur caused by the atmosphere but will be measuring the blur caused by your poor tracking/mount.
If your tracking rms is 1.2” and the sky is 1.0” then your mount is limiting how sharp your images can be and not the atmosphere. What helps: Your polar alignment must be very good as well as tracking. You’ll need a good mount that
is well balanced and not overloaded. Take shorter exposures in the 30 to 60s range. This will help reduce the effects for less than perfect tracking
Software:
You will need software that can read and measure raw image data. These examples are illustrated with Pixinsight. Step by Step:
- Point your well-prepared telescope and camera to zenith or anywhere about 80 degrees altitude.
- Take a series of 30 to 60s exposures with a luminance filter (UV/IR block). An average of say 10 is enough for any given time.
- Measure the eccentricity of the images (Script – Image analysis – FWHMeccentricity) discard any of the images with an eccentricity of more than 0.5. These have either poor tracking or collimation issues
- Crop to the inner say 50% of the images.
- Make sure your mount is connected to your imaging software so you have information like date, time, geo coordinates, sky coordinates and focal length populated in the FITS header of the file.
- With software like Pixinsight, you can platesolve the images and calculate your exact focal length.
(Script – image analysis -image solver) - Take your calculated focal length and note it down. For example 1850mm.
- Look up your cameras pixel size, eg 3.6 microns
- Calculate your image scale, that is arc seconds per pixel:
Scale = ( Pixel Size / Telescope Focal Length ) X 206.265
So for our example: image scale = 0.4 arcseconds / pixel - Measure the FWHM of the images (Script – Image analysis – FWHMeccentricity) You will see a number like FWHM = 6.7 pixels, calculate the average of say 10 images. Subframe selector can do this too, but make sure your settings are correct so you are to measuring hot pixels!
- Once you have both your FWHM and your scale you multiply them to get the FWHM of the stars in arcseconds:
So in our case measured FWHM = 6.7 pixels x 0.4 (scale in arcseconds per pixel)
Seeing = 2.7 arcseconds - Now that you know the sky seeing you can better decide what the highest focal length and smallest pixel size you can use (2.0x to 3.0x of the seeing in practice the maximum resolution you can work with will be for)
For in out example with the sky seeing at 2.7” the max scale you can sample with will be 1.35 to 0.90 arcseconds per pixel.
Knowing your maximum pixel scale (0.9 arcseconds here) and your camera pixel size, you can determine the longest focal length for correct sampling by:
Focal Length = ( Pixel Size / scale ) X 206.265
With a 3.6 micron camera pixel size the max focal length will be 825mm
With a 5.4 micron pixel: 1,237mm
With a 9 micron pixel: 2,062mm